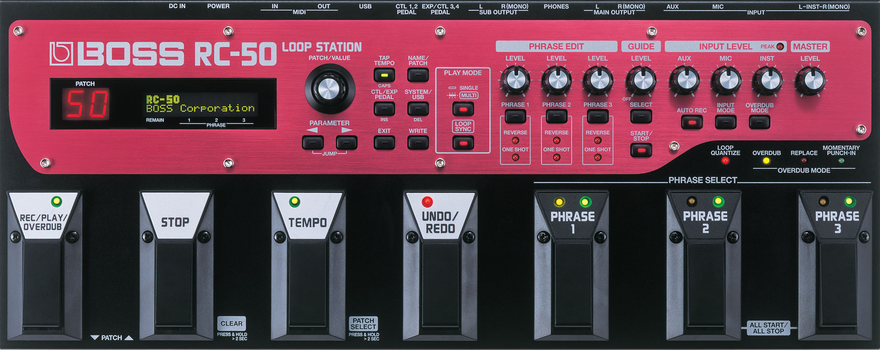
MIDI-Assistant - Free software tool for RC-50, RC-300 and RC-505
Sometimes I wished the pushing of the RC-50 pedals could be kind of automated, so I could concentrate on playing. When checking the MIDI-functions of the RC-50, I found out that this is really possible (to a certain degree; later I found out it is completely possible with an RC-505). So I bought an USB-to-MIDI interface and started exploring with it. I found the free downloadable "Bome Send SX" software by googling, which I used to check which messages are sent by the RC50 or other MIDI-devices - and how the RC50 reacts to which MIDI messages. There might be a lot of MIDI-software available which can do the job of sending the needed MIDI messages at the correct timing, but I decided to try programming one myself. I found the C# MIDI Toolkit by Leslie Sanford at Code Project, and wrote a little MIDI-assistant software. You can Download it from my GMX-Cloud here (you might be warned for viruses - I tell you that there are no viruses included. Keep your Antivirus up-to-date, so you don't have to be afraid...) :
Download Sources (C#)
Download MIDI-Assistant for Windows11
Download Sources for Windows11 (C#)
What you need to use the MIDI-Assistant with your looper:
*) A windows computer or laptop with an USB interface and .NET framework 4.0 being installed
*) If your looper only supports MIDI via a 5-pin MIDI socket, you will need an USB to MIDI interface with one MIDI-IN and one MIDI-OUT channel, like this:

How to connect:
*) Connect the MIDI-IN of the looper with the MIDI-OUT of the USB-to-MIDI-interface (out of the PC - in to looper)
*) Connect the MIDI-OUT of the looper with the MIDI-IN of the USB-to-MIDI-interface (out of the looper - in to the computer)
*) First connect the MIDI interface to the PC, start MIDI Assistant, then connect the interface to the looper. If you don't follow this sequence, you migh get some error messages. Try sending a few commands - if you get an error message, restart MIDI assistant and try again. Once some commands can be sent without error, the program runs stable.
*) For the RC-505, it works to just connect PC and looper with an USB cable. System / USB MODE must be set to AUDIO/MIDI for this
What can the MIDI-Assistant to for you:
When you push START on the looper, the MIDI-Assistant gets a MIDI-Start message and starts counting the MIDI-Clock messages being sent out from the looper. 24 MIDI-Clock messages are sent within one quarter beat, so the timing is very accurate. The MIDI assistant exactly knows the current quarterbeat of your performance, and it can send a MIDI-message to the looper after each desired number of received Clock-messages beginning from performance start.
Available messages:
I) Special for RC50:
*) Start: starts the currently selected phrase, or all phrases which are set to SimulStart in the patch-settings. This does only work if MIDI-Sync is set to REMOTE in the System-Settings and in the Patch settings
*) Stop: stops all phrases and the guide. This does only work if the MIDI-Sync is set to REMOTE in the System-Settings and in the Patch settings
*) Program Select: switches to the selected patchnumber. Recording of the new selected Patch starts immediately if it is empty, otherwise playing starts. If the already selected patch is sent, all unsaved recording is cleared and the current patch starts over, like it was just selected.
*) CC#1 or CC#7: lots of settings can be adjusted with the CTL/EXP PEDAL button on the RC50 what CC#1/CC#7 can do on the RC50. Sending Phrase Levels is very useful to simulate Single Mode in Multi Mode - with this, it is possible to start recording immediately in simulated "single" mode when a phrase is changed, which is not possible usually. See Task 11 at START page.
*) CC#80: lots of settings can be adjusted with the CTL/EXP PEDAL button on the RC50 what CC#80 can do on the RC50. I usually use it for UNDO, so it avoids getting me busy with Task 1 (see start page). I also tried sending CC#80 for switching PlayMode from Multi to Single - all phrases stop, but a Start message can follow up to keep playing - give about one quarterbeat after the CC#80 before sending start in this case, otherwise nothing will happen (you can place a defined pause here and play a fill).
Unfortunately CC#80 is ignored if being sent in the wrong timing. After pushing a pedal, give about one quarterbeat time before sending a CC#80 message. But AFTER sending CC#80, there is no time-limit, so it works very well for UNDO.
Please note that Data2 of the MIDI-message must have at least a value of 64, or the message is ignored in any case by the RC50.
One nice idea: You can set the cursor at the send-button of CC#80 and use the SPACE-bar as additional pedal.
*) Using MIDI-relays: The RC-50 has 4 footswitch inputs - these inputs can be used with MIDI-switchable-switchers, so called MIDI-relays or MIDI-switchers. These switchers can be automatically switched with the MIDI-Assistant. This gives you the possibility to automatically trigger up to 5 pedal actions by MIDI. Check the internet for MIDI-relays, for example here: https://www.microdesignum.cz/EN/eshop/MIDI-Switchers/
II) RC-300 and RC-505:
*) Program Select: switches to the selected Memory. Recording of the new selected Memory does NOT start immediately. To Start recording, send a Start-Record message 1 -2 clockcounts after the new Memory is finally selected (after ending previous loop) .
Sending ProgramSelect with the number of the currently selected Memory has no effect.
*) CC#1 -#31, CC#64 - #95
Each CC can be assigned to a specific action in the Assign Switch parameters. For example, to Start/Stop Playing of Track1 with CC#1, make the following Assignment in one of the Memory / Assign
Switch settings: Source CC#1, Target TR1 PLAY/STOP. For switching by MIDI, the Source Mode has no effect ("TOGGLE" and "MOMENT" act equally). Values for Data2 must be within zero and 127. If a
single switching action is assigned, a Data2 value between 64 and 127 switches to ON-state - can be seen as "Pedal pressed" state. A value between zero and 63 switches to OFF state - can be seen
as "Pedal not pressed" state. So, if you want to use a specific CC multiple times for the same switching action, you have to send CC#x Data2=64 (switch ON - action happens; like pressing a pedal
and keeping the foot on the pedal), CC#x Data2=63 (switch OFF - nothing happens; like lifting the foot from the pedal), then send again CC#x Data2=64 (switch ON - action happens again).
Sending just CC#x Data2=64 multiple times has no effect! This would be like pressing a pedal and then try to press it again without lifting the
foot...
Within MIDI Assistant, I recommend to use a CC-Ramp with Data2-value starting at 64 and ending at 63 with at least 50 ms duration (100 ms are even better) - so this uses just one single table entry for each time the switch-action should be triggered. Probably this is the case also for the RC-300 (I don't have one).
As opposed to the RC-300, on the RC-505 each single pedal-action can be mapped, even RECORDING => fully automated looping without any interaction is possible on the RC-505! (A dream has come true :-)
=> See demo video
Instructions:
After Starting, the MIDI devices selection dialog comes up. If your USB-MIDI interface or other input device is not plugged in, click "Cancel" to use the program anyway. The selection can be done later on in the MIDI-Menu.
- STANDARD:
*) When using an USB-MIDI-interface like above, use "USB MIDI Interface" for Input and Output (of all channels)
*) When using an RC-505 with MIDI over USB, just select "RC-505" for Input and Output,
- ADVANCED:
By default, the checkbox "Use same device for all channels" is checked. Selecting a device for MIDI-channel 1 selects this device also for all other channels. This is useful for most cases - all messages are sent to the same Device, no matter which MIDI channel is used in the message. Other devices can be connected using a MIDI-splitter-cable. For example, the looper is connected and listening to MIDI-channel 1, and also a guitar-effects-board is connected, listening to MIDI-channel 2. Messages for the looper can be sent using MIDI-channel 1, messages for the effects-board can be sent using MIDI-channel 2.
But many newer devices do not have a standard-MIDI-socket, they just use an USB-connection for MIDI. If you want to send MIDI-messages to your looper AND to another MIDI-device connected via USB, you can select this other device as Output-Device for a specific MIDI-channel. All messages with this MIDI-channel are sent only to the selected device. So, for example, you can use MIDI-channel 1 for your looper, and send messages for your BOSS-ME80 effects-board using MIDI-channel 2 => like I did in the screenshot below for the "Unsquare Dance" video: https://youtu.be/tObV2gFl3gM

The selected device must be configured to listen to the MIDI-channel where it is selected. Usually you can configure OMNI on the device, so it listens to any MIDI-channel.
*) MIDI Files
MIDI-Assistant can playback MIDI files during performance, for example a drum-loop. Playing is driven by the clock-messages of the looper, so the speed is exactly synchron to the looper speed. Select where the data of a MIDI-file should be sent to - you can playback with the default device on your computer (like "Microsoft GS wavetable synth"), but the sound is not very good.
You can playback the files with any VST-plugin - to do this, create a virtual MIDI-port with loopMidi, and select to play MIDI-files with this port. Then run the VST-plugin with NanoHost software, and select the loopMidi-port as input-port in Config - MIDI In Settings - Input Port1
*) MIDI-Thru settings
If you want to send-on Clock-messages received from the Input-Device to some other Output-device, you can do this here. You can slect if just Clock-message, and/or Channel-messages are sent on, or if you want a full MIDI-Thru connection to the specific output device.
The MIDI-Start-message from the input-device is sent to all used devices - to devices selected as output-devices, and also to devices which have any of the MIDI Thru checkboxes checked. So, for example, it is possible to sync a drum computer to the Clock of the looper. This is the same for MIDI-Start/Stop messages in the Send-Table.
Main Screen:
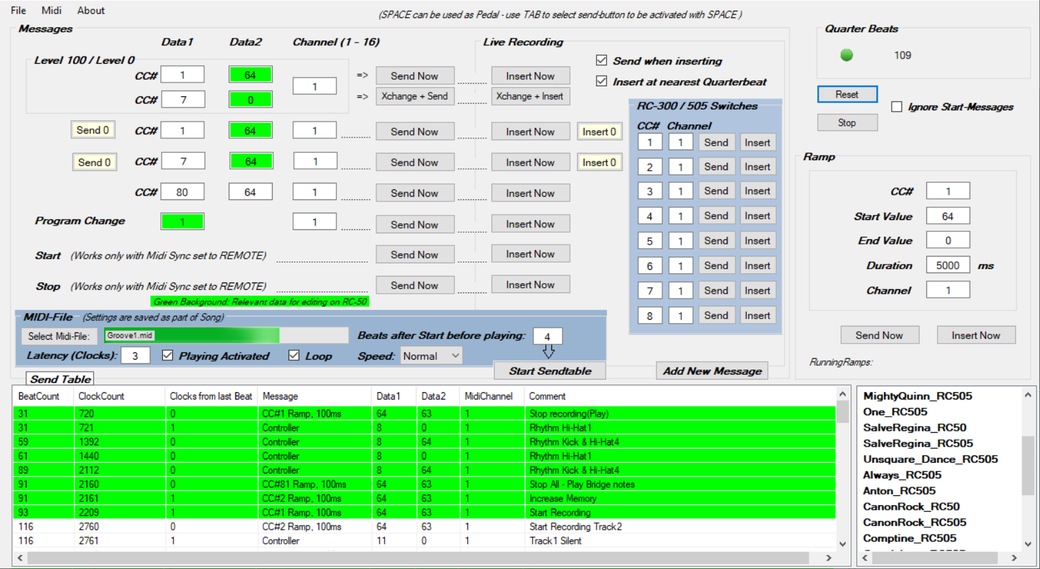
Basic Principle:
When you start the performance on the looper, it sends out a START MIDI-message. MIDI Assistant detects this and starts counting the Clock-Messages coming from the looper. At each Quarter-Beat 24 Clock-messages (Clock-Ticks) are sent. The current number of Quarter-Beats received since performance start can be seen in the "Quarter Beats" field. A green indicator flashes with each Quarter beat.
After starting performance, the messages in the Send Table are sent automatically exactly at the programmed Clock-Ticks after starting. Each message which was sent gets a green background.
REMARK: When the Guide is set to 6/8, the Quarter-Beats are defined on eight-beats 1, 3, and 5.
Even when you stop all phrases, the looper keeps sending Clock-Ticks. So you can place a break for a fill with Stop, while the Quarter-Beat number keeps increasing. To Stop counting Clock-Ticks, click the "Stop" button. To start a new performance or restart the current one, click the "Reset" button - the MIDI-Assistant waits for a new START message coming from the looper.
Messages Group
All messages in this group can be edited for direct sending or inserting with the corresponding buttons. The green background shows the most relevant data for editing on an RC-50. MIDI can only send data from zero to 127, so don't enter any numbers bigger then 127.
MIDI -File Group
In the MIDI-File group, you can select a MIDI-File for playback during performance. The Latency can be adjusted to perfectly match the looper-rhythm. Playing can be activated/deactivated, grooves can be played in a loop. Speed can be adjusted between normal, half or double speed - this is useful if you have for example a 6/8 Midi-file, but want to use a 3/4 measure on your looper. When using the "Start Sendtable" button, you can wait for the Count-in Beats to finish ("Beats after Start before playing") and then start playing the MIDI-file without skipping the start-notes (when playing is started immediately, the first notes of the Midi-file might be skipped due to the latency).
Check out the tooltips of the specific buttons for more details.
"Start Sendtable"- Button
The "Start Sendtable" button can be used when you don`t want to push a button on the looper. After clicking, counting of the beats starts, the messages in the Send Table are being sent. If you place a message to start recording/playback at Beatcount 1, then this action happens right after clicking "Start Sendtable".
If you select Count-In Beats with "Rhythm: RecCount / PlayCount" on the RC-505, these beats are already counted for the sendtable (only when clicking "Start Sendtable"). To silence down the looper-rhythm after counting-in, place a Rhythm-Level zero message at 12 Clocks after the last count in beat (e.g. at Beatcount 4 + 12 Clocks).
Ramp-group
In the Ramp group, you can send value-ramps of defined duration, for example to fade out a specific track. Within the duration, Midi-messages are continously sent, starting with the startvalue and ending with the endvalue. All running ramps are shown next to "RunningRamps", until the duration is passed. For an RC-300 or RC-505, a 50 ms ramp starting with 64 and ending with 63 can be used to trigger a single switch-action.
RC-300 / RC-505 group
In the RC-300 / RC-505 group, you can define the CC# number and MIDI-channel to trigger an action assigned in the Assign-switches of the looper. On these loopers, this is similar to trigger an action with a MIDI-pedal - you have to push the pedal (a value >= 64 is sent), and release the pedal (a value <= 63 is sent) before you can push the pedal again. So the MIDI Assistant uses a Ramp where first a value of 64 is sent (switch ON), and after a duration of 100 ms, a value of 63 is sent (switch OFF) - this is like pushing and releasing a pedal.
Songs
Below the Ramp-group, there is a list with all files contained in the subfolder "Songs", which is created automatically in the path of the MidiAssistant.exe. When selecting a file, it is loaded automatically - so you can step through all the songs you need for your gig by just using the down-key. Doubleclicking the currently selected file reloads it.
"Send Now" buttons
With the "Send Now" buttons you can directly send the message to the looper for testing, or for using the MIDI-Assistent as an additional Pedal: select the wanted "Send Now" button with the TAB key, and press SPACE to send the message. Putting the keyboard on the floor, you can push SPACE with your feet and have an external Pedal.
Live Recording group
With the buttons within "Live Recording", you can insert a MIDI-message to the send-table while the looper is playing, at the current timing. When the message should be also sent to the looper when inserting, check the "Send when inserting" Checkbox. When you want to place the message exactly at a Quarter-beat, check "Insert at nearest Quarterbeat" - but beware of Quarterbeats not being heavy beats in 6/8 or other measures using 1/8 notes.
"Ignore Start-messages" checkbox
When you want to make some adjustments on the looper, it might get useful to prevent MIDI-Assistant from starting each time you start the looper - check the "Ignore Start-messages" to do so.
"Add New Message" - button
You can also add messages to the sending-table without starting a performance. Click the "Add New Message" button or select "Add New Message" in the menu appearing after right-clicking the table. Edit your message here, you can also put some comment:

Each message in the send-table can be edited by double-clicking it, or by right-clicking it and select "Edit message" in the appearing menu. In this menu "Delete message" is also possible.
Increasing/Decreasing the beatcount-number of one or multiple messages can be done by selecting the message(s), do a right-click and select the corresponding menu entries.
After finishing, save the send-table with File / Save or File / Save As...
After starting performance, the messages in the table are sent automatically exactly at the programmed Clock-Ticks after starting. Each message which was sent gets a green background.
REMARKS:
- if you want to send multiple messages at the same time, just place them one after the other with the distance of one Clock-Tick. So the MIDI-Assistant starts sending the first message, and continues with the next message without waiting for the next Clock-Tick to happen. So all consecutive messages with the distance of only one Clock-Tick to the previous message will be sent one after the other without delay (one message takes about three milliseconds). Be sure to use version 1.0.0.5 or higher for stable operation
- If you send multiple ramps for switch-actions on the RC-300/RC-505 at the same time, be sure to use at least 100 ms ramp duration for each ramp. Use different ramp durations for each ramp, so the ramps do not have to send the ramp-end messages all at the same time. When using multiple ramps of equal length at the same time there is a risk that one of the switch actions is just skipped...
- Program Change messages might be ignored if you are currently adjusting some parameters in a submenu of the looper.
- RC-50: CC#80 messages might be ignored if sent within 500-1000 ms after pushing a pedal. The message triggers an action each time it is sent
- To use Start/Stop messages on the RC-50. MIDI Sync has to be set to REMOTE (both in System and in Patch Settings)
- The MIDI Assistant surely can be used also for other MIDI devices
- You can also switch sounds of a MIDI guitar-effects-board with the MIDI-Assistant during performance. Use separate MIDI-channels for the
looper and the effects board (System / MIDI Omni must be set to OFF). When not using the USB-port of the looper and/or the effects board, you will need a MIDI splitter cable to split the MIDI OUT of the USB MIDI interface for connecting it to the MIDI IN of the looper and also to the MIDI IN of the effects board. See "Unsquare Dance" video: https://youtu.be/tObV2gFl3gM
- If you change the speed on your looper, MIDI-Assistant follows that speed change. So you can practice with slow speed using the same file in MIDI-Assistant
Release Notes:
V1.0.0.0: Initial Version
V1.0.0.1: Fixed glitches during Single Mode Simulation
V1.0.0.2:
* ATTENTION - COMPATIBILITY ISSUE: Midi-Channel stored with previous versions is increased by one!
* Made display of Midi-Channel starting from 1
* Made Program Change Data1 display starting from 1
* Made QuarterBeat display starting from 1
* Added Ramp feature
* Added Songlist
* Added Xchange buttons
* Added checkbox to ignore next Start message
* changed extions of Midi-Assistant files to *.txt; *.mas files can still be used
V1.0.0.3:
* Added RC300/RC505 group box
* Changed display-format of Ramp in table
* Changed Default ramp values in "Add Message" for usage with RC300/RC505 switches
* Changed some labels
* Changed TAB order
* Added default songs
V1.0.0.4:
* Fixed display of Beatcount going out of sync
* Value Ramp sends first message before starting ramp-thread
* Remember Scrollposition after editing/adding messages
* Added context menu entries "Increase Beatcount" and "Decrease Beatcount" for all selected messages
V1.0.0.5:
* Changed duration for RC-300/RC-505 switching ramps to 100ms
* Fixed wrong colouring of sent messages
* Fixed index out-of-range exception
* Fixed Enumeration modified exception
* Enable sending message at ClockCount zero -ATTENTION: still some strange behaviour, don't send anything at ClockCount zero
V1.0.0.6:
* Implemented MIDI-Channel/Device mapping
* Implemented sending-on Clock messages
* Sending messages at ClockCount zero finally works now
* checkbox "Insert at nearest Quarterbeat" checked by default
V1.0.0.7:
* Use all 16 MIDI-channels
* Changed checkbox to "Ignore Start-Messages"
* Added MIDI-Thru settings
* Added support to play MIDI-Files
* Added "Start Sendtable"-button
V1.0.0.8:
* Show full MIDIfile-name in tooltip
* Added support for System Exclusive Messages
* Added ME-80 Harmonist System Exclusive Messages for selection
* Pre-Select RC-505, ME-80 (output device channel 2) and loopMIDI (MIDI-files)